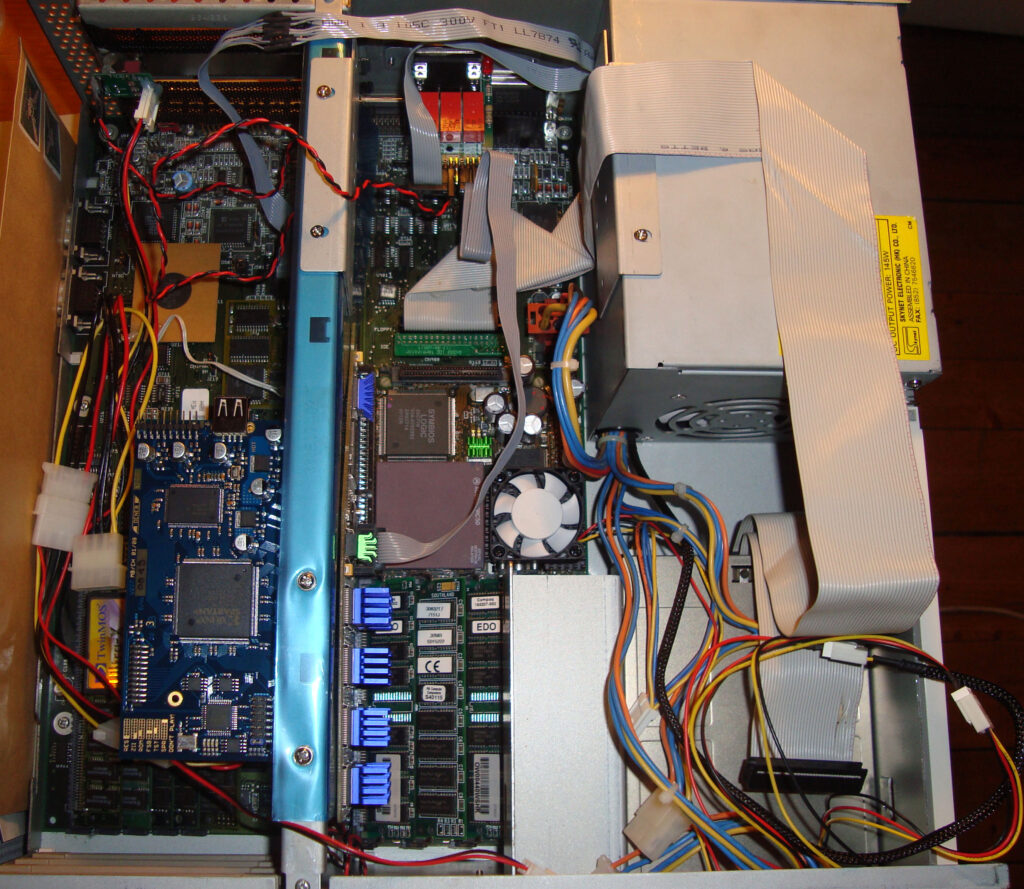
When space is small you do stupid things (both PCI cards, Voodoo 3 and PPC board connected to the Prometheus Resurrector).

When space is small you do stupid things (both PCI cards, Voodoo 3 and PPC board connected to the Prometheus Resurrector).
There has been an active initative at getting some PCI cards with PPC CPUs working on Amiga systems as old school PPC cards on PCI enabled big box Amiga computer. That means it is possible to run WarpUp PPC software on Amiga with modern PPC hardware. What is old is new again!
I have been following this project with some interest from time to time but never pulled the trigger to get the relevant hardware to get a setup going.
Partly it was because I was swamped with Amiga hardware projects, partly because PPC on 68k Amigas was not really that relevant anymore – unlike yesterday when it was the next logical step for the Amiga to evolve to. Secondly, I could not wrap my head around how to set it up or where to find an affordable card.
But times change and I reconsidered that last opinion about it not being relevant when I skimmed through the supported applications a year or so ago.
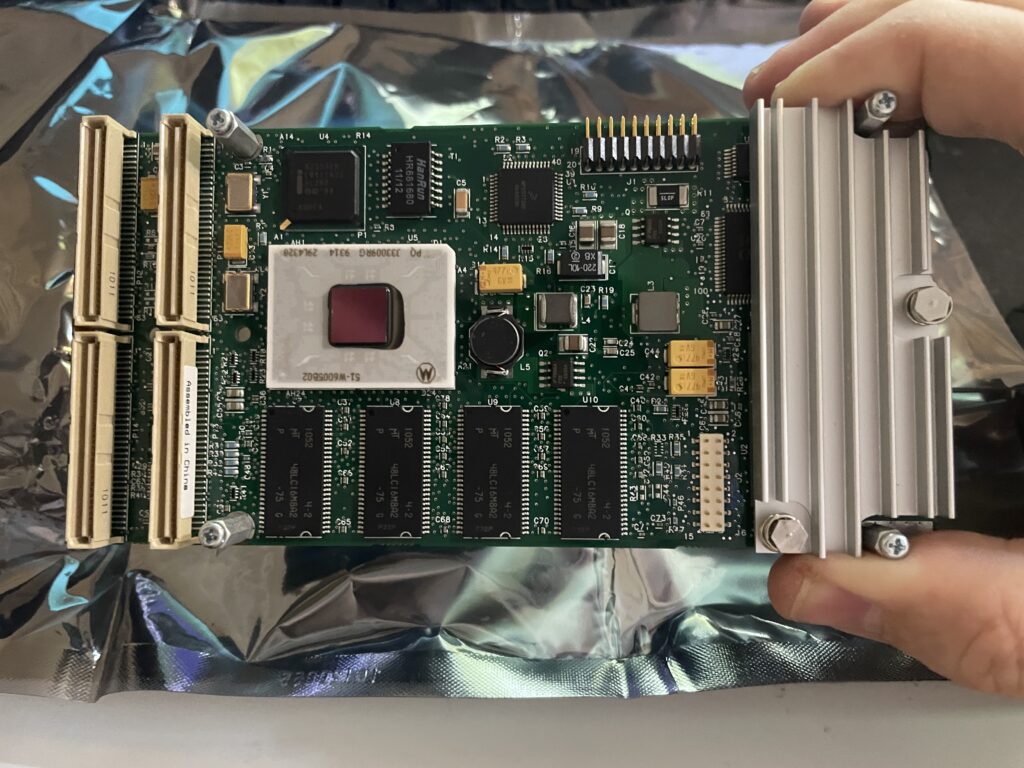
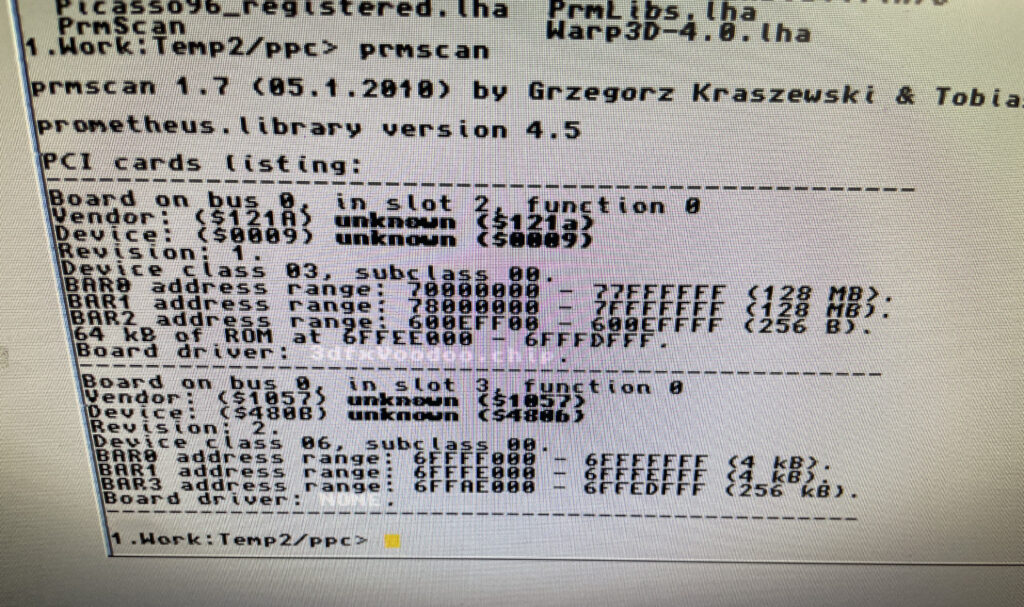
One supported PPC card by the initative to get PPC working on PCI Amigas is the Emerson-Motorola PrPMC8005E-1259 that I was lucky to be able to pick up for a very reasonable sum on Ebay. All I needed now was a weekend to get the this insane setup going.
The PrPMC8005E-1259 contains a 450 MHz MPC7410 G4 PPC CPU and 128 MB memory. It is a PMC card and fits a PCI card that acts as a PMC carrier on the Amiga.
Originally this CPU card is not meant to be used on an Amigas at all, I think the main use is in industrial applications and in telecommunication, but exactly how and why – No idea!
Before I continue, lets look at some previous Amiga PPC setups I toyed around with a few years ago.
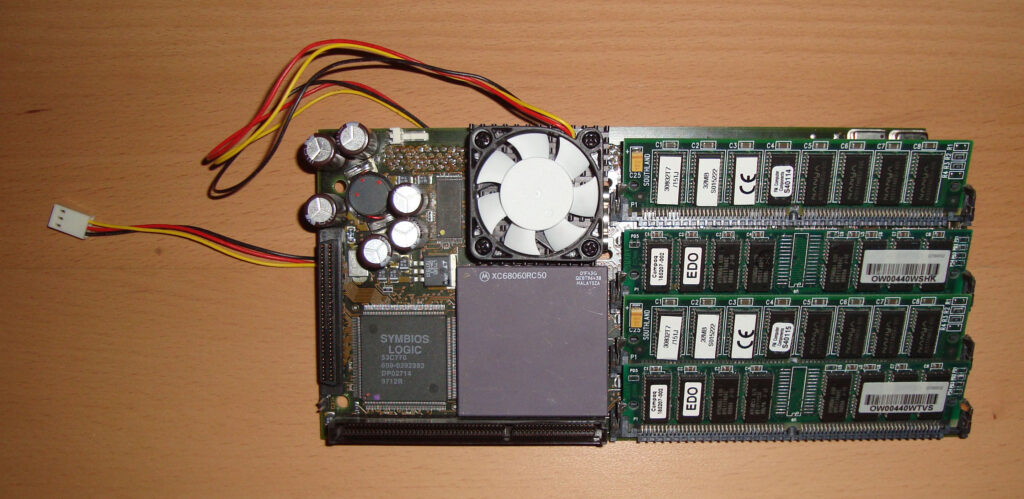
This was a top of the line Phase 5 turbo board that I got when I purchased an Amiga 4000D second hand in 2007. This was the top model from Phase 5 that had a 233Mhz PPC chip and a 68060 68k CPU. I had a CVPPC graphics card for it and was running SCSI with a 10k HDD that sounded like a jet once spun up. It was a fast setup but was highly complex in setting up. It was also noisy and hot running. I remember I spent a few days trying to get it going before being successful. I think I paid 400 euros for the complete system.
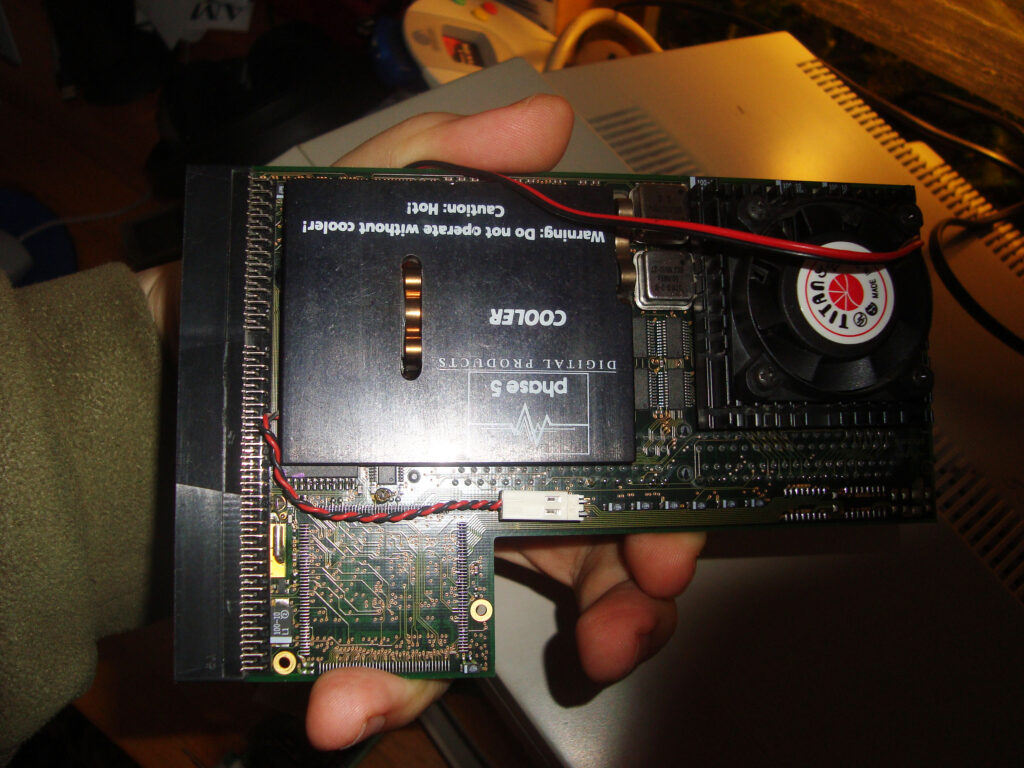
Here is another Phase 5 turbo card, it is the Phase 5 BlizzardPPC, I remember that it had a 68040 68k CPU and a PPC clocked at 200Mhz (I think). I have forgotten where I got this card from, I guess it was in a bundle, possibly with an Amiga 1200 tower, I had the BlizzardVision graphics card for it too.
Here is my Amiga 4000D setup from 2007 with the CyberStormPPC installed. Not much has changed with today really, just the shape of the hardware and the amount of machines.
I got AmigaOS4 for classic PPC system and installed that on the computer above. Then I played around with some software in 68k Workbench, but no matter how I twisted and turned things I felt like I had expensive hardware that I used too little and just heated up the Amiga 4000 too much – So I sold it all!
…and now I am back (never sell stuff).
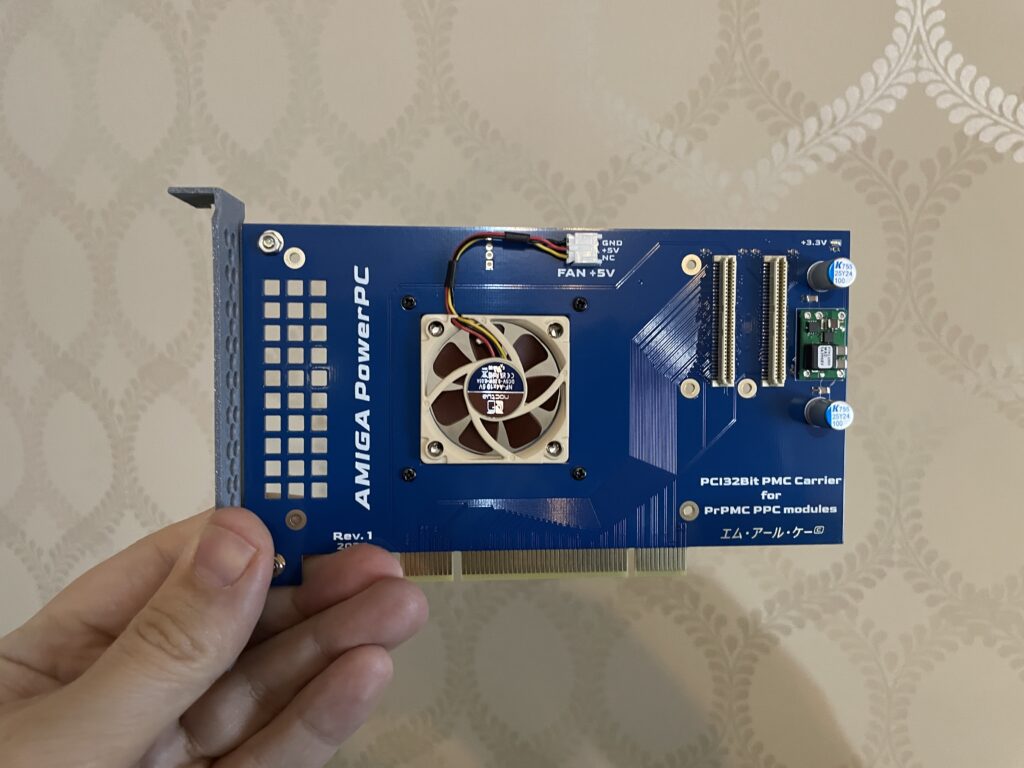
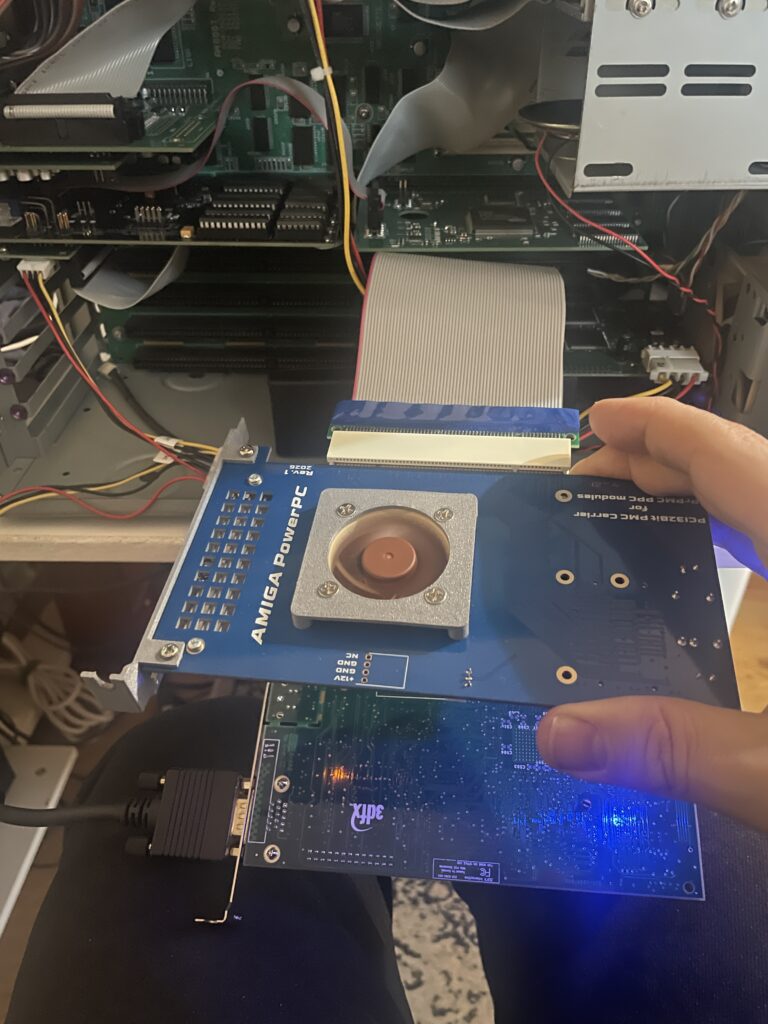
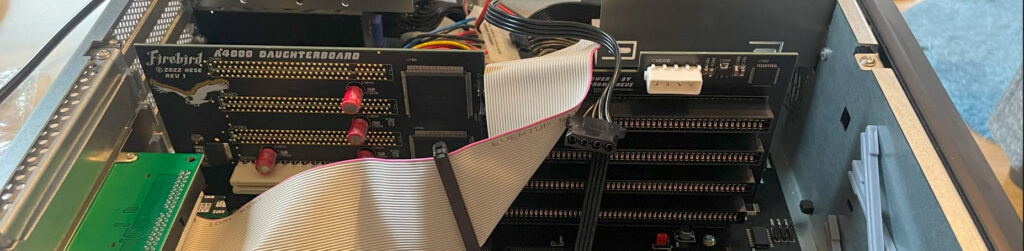
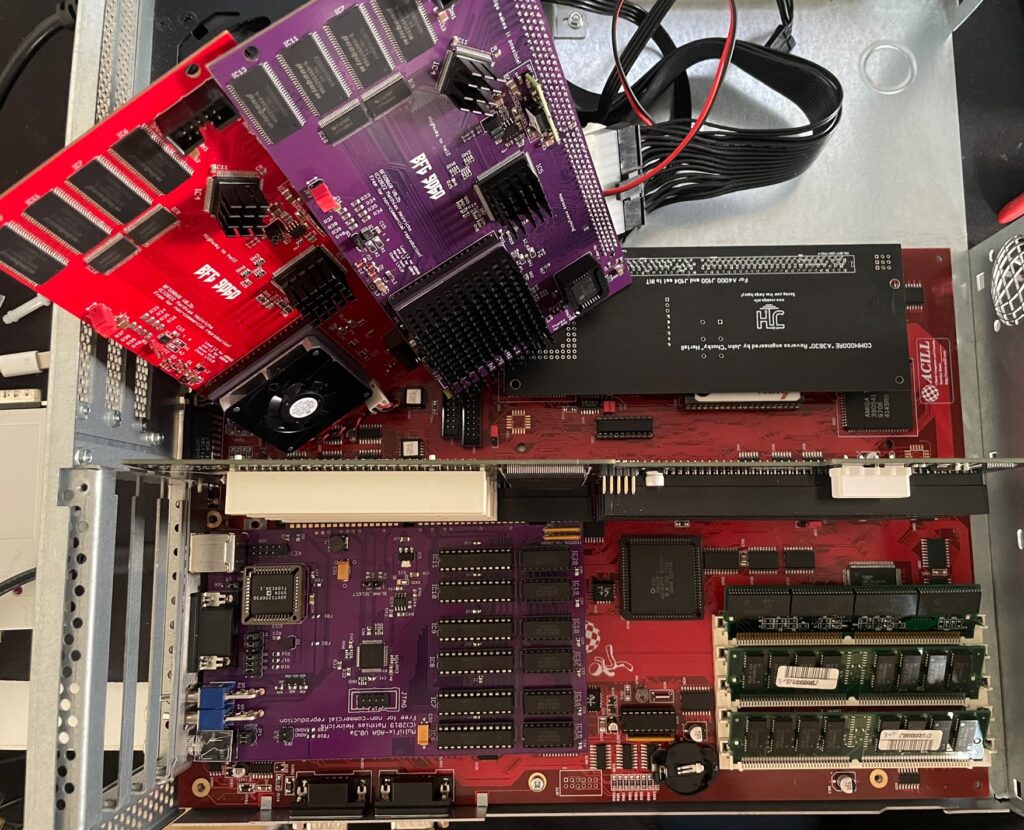
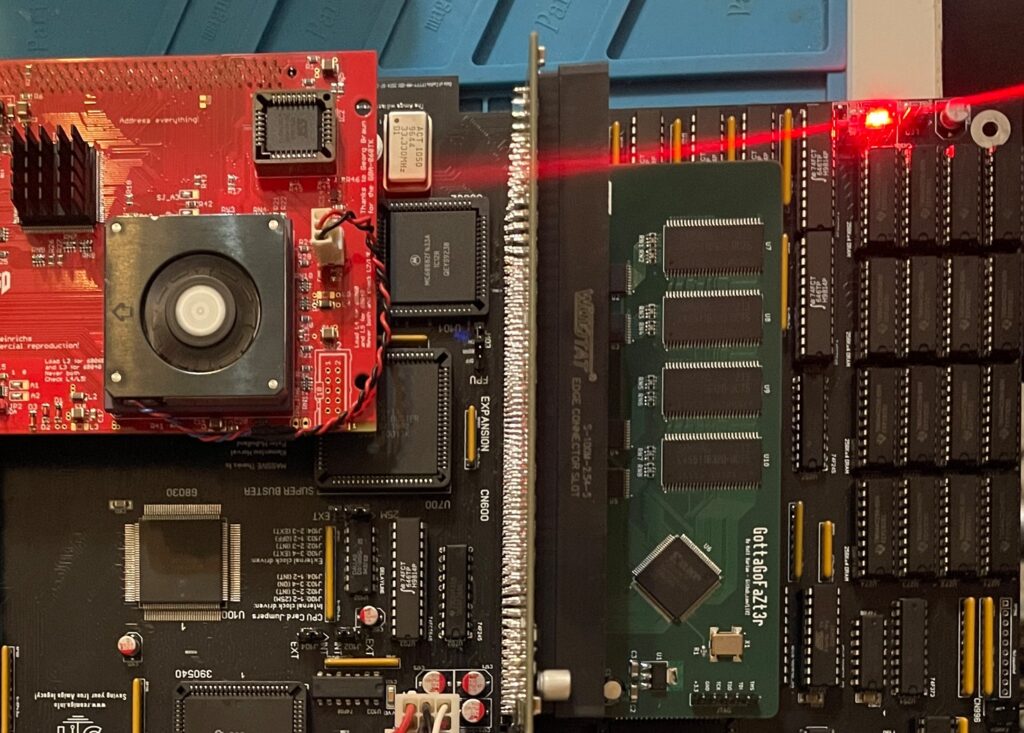
So to use the PMC PPC card above on the Amiga you have to add it to a PMC carrier that slots into a PCI slot. This version of the PMC carrier was made by a friend in the hobby that I met on a Discord channel we frequently visit. It has a small 5v 40 mm fan to cool the PPC card that sits under it.
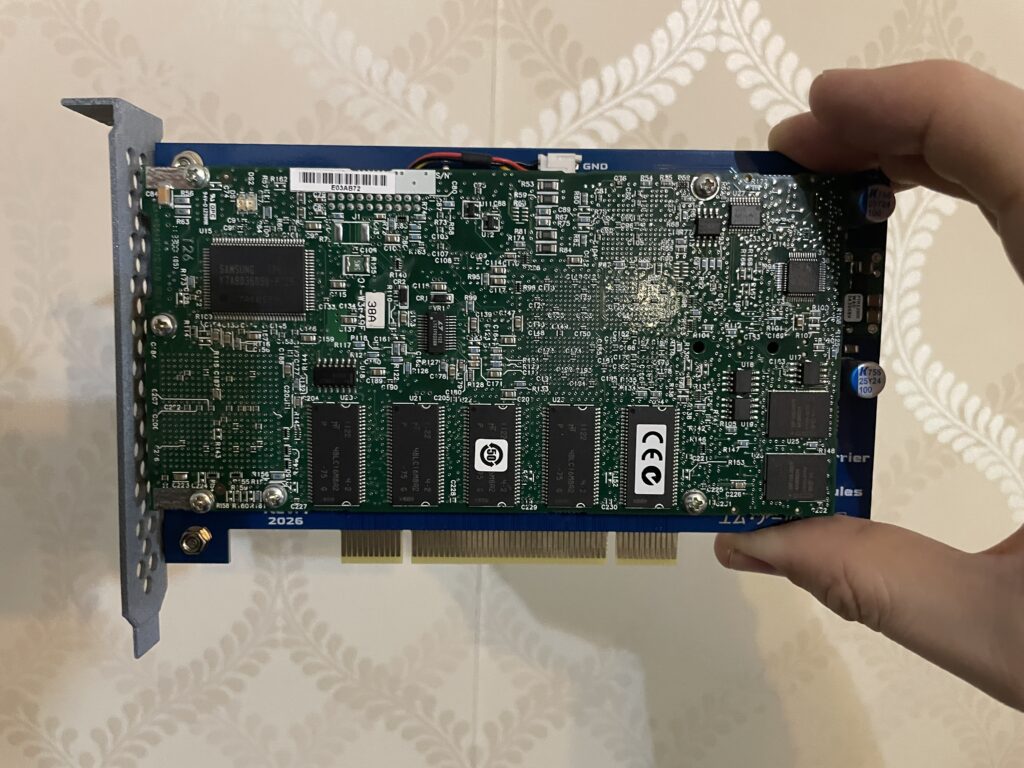
The Emerson-Motorola PrPMC8005E-1259 PPC PMC card is mounted to the PMC carrier board. As you see it is a perfect fit. The 3D printed bracket has holes for ventilation.
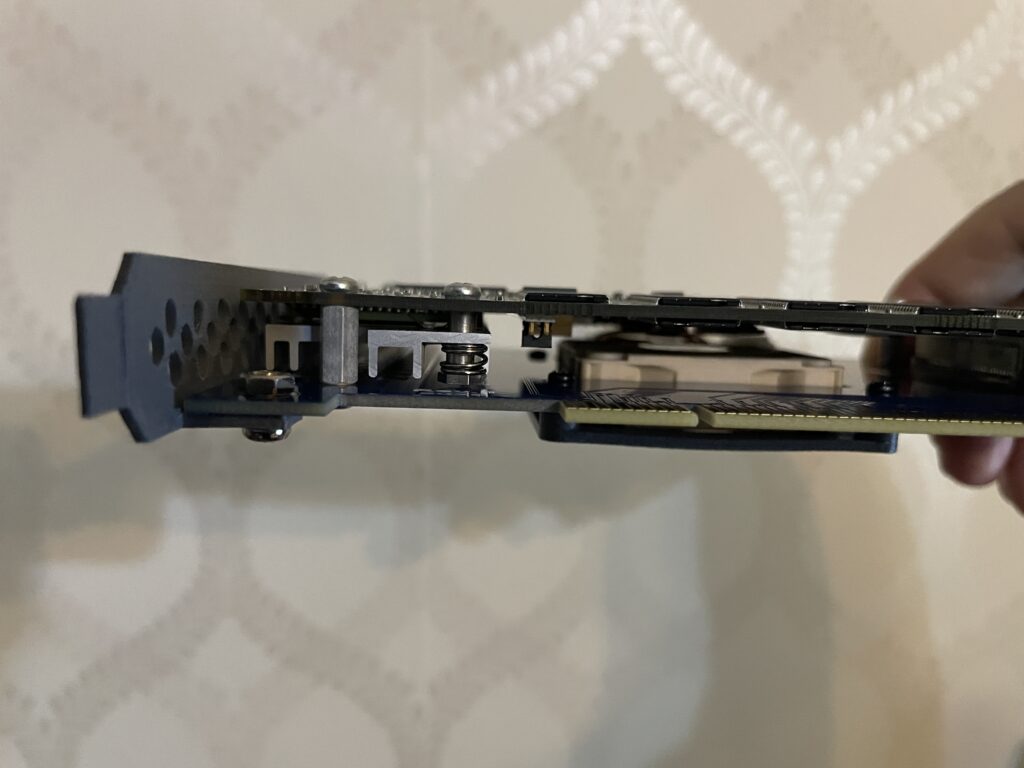
As you can see, the card is really slim even though its a sandwich. The CPU on the PPC card sits under the heatsink on the left side.
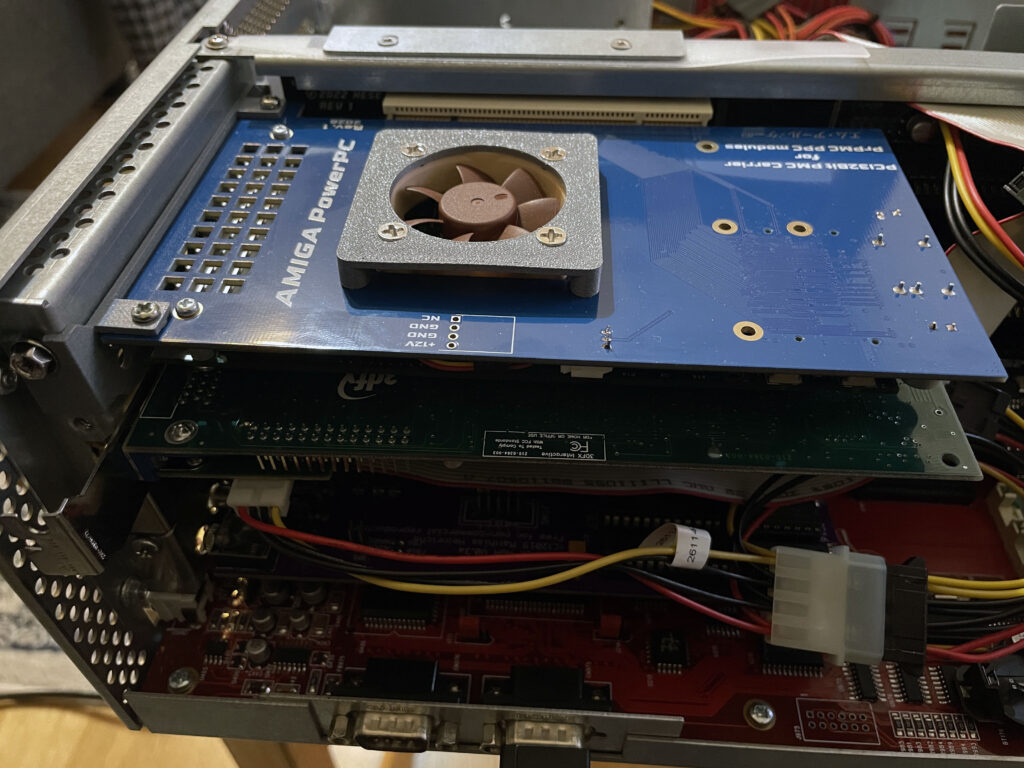
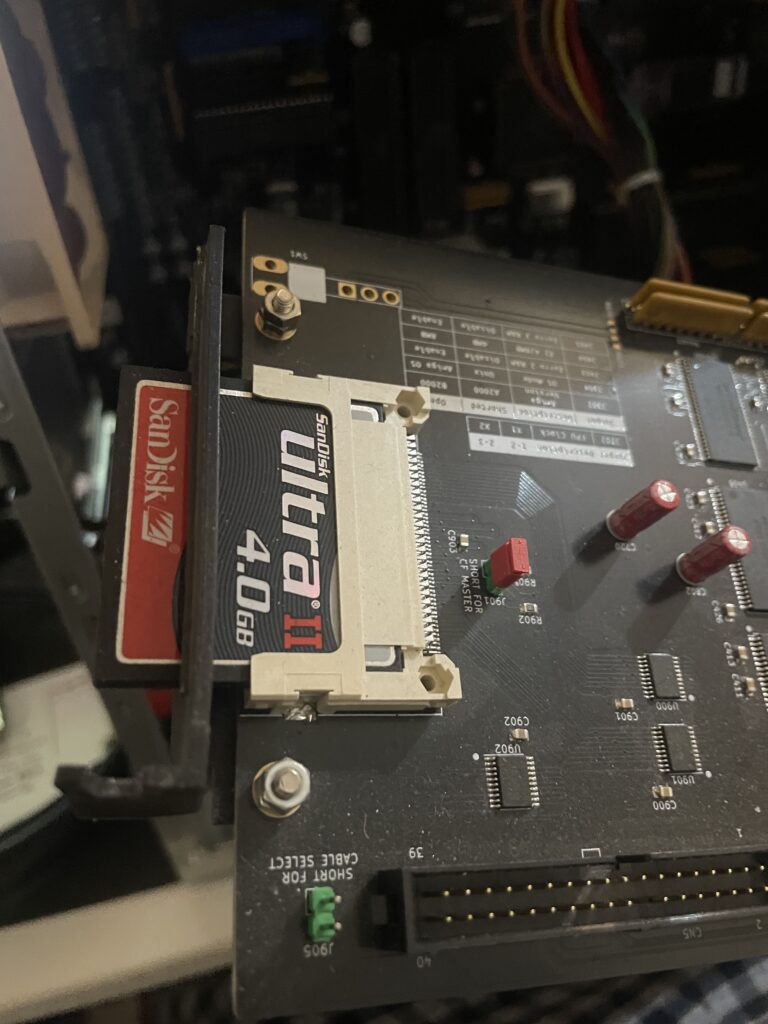
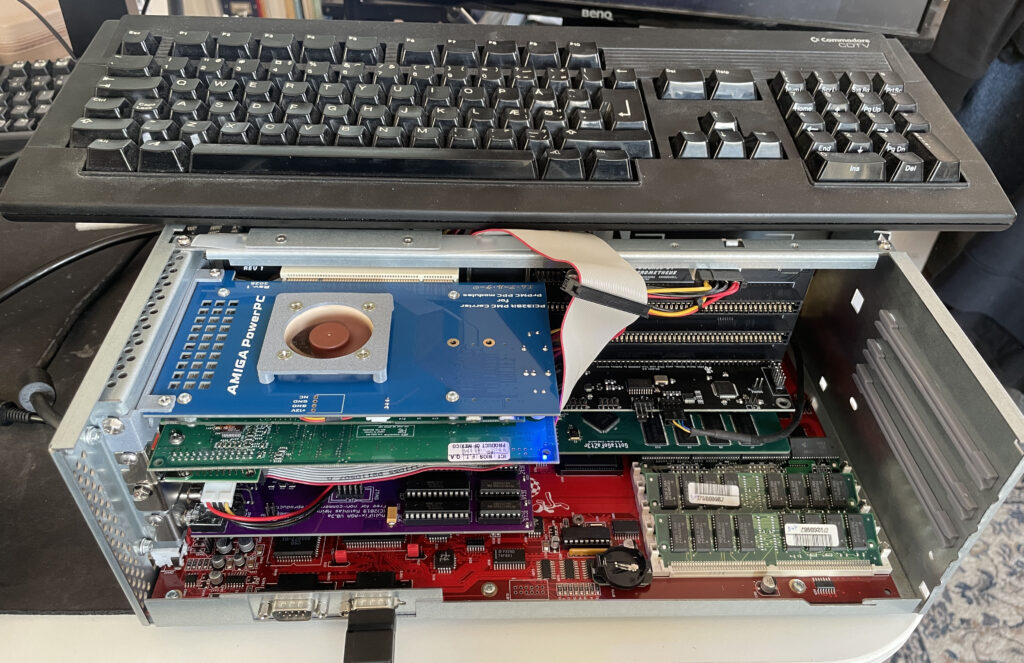
My Amiga 4000D has a Firebird PCI daughter board installed. The PPC card is inserted in the top PCI slot. The card under the PPC card is a normal PC 3DFX Voodoo 3 card, without it the PPC card wont work.
The Voodoo 3 graphics card is the AGP version, that is why the bracket is not flush with the case as there is an adaptor that converts AGP to PCI and takes up some space. Bottom slot contains a Multifix-AGA scandoubler.
My original plan was to use a 3DFX Voodoo 4 card but my Voodoo 4 failed to work in my setup in combination with the PPC card for some reason. Thus so I chosed a Voodoo 3 instead that is better supported on the Amiga.
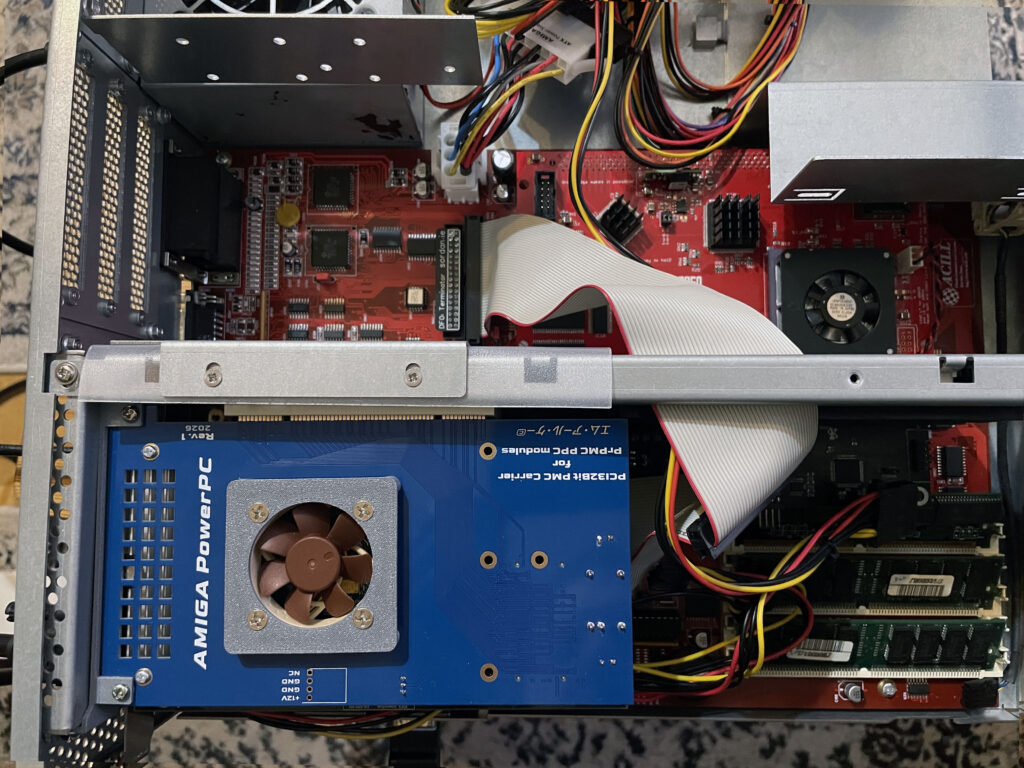
Here is the setup from the top. Even with active cooling this is a really hot running setup, no joke. The 3DFX Voodoo 3 graphics card gets very hot. I wont be running long sessions with the lid on (if at all) and will possibly move the PPC/3DFX setup to a tower setup in the future to enable better cooling if possible.
To run the A4000D/PPC/Voodoo 3 setup reliably with the case closed would take some extreme cooling mods and cooling improvements to the A4000D case. Not sure how to or if I want to chop up this 350 euro replica case to enable more fans, but clearly something has to be improved if this is the way forward.
As is de-rigeur when dealing with Amiga hardware something has to be weird and strange, unexplainable or simply illogical or based on an error or fault that can not be guessed by mere mortals (or it might be me who f”d up when building something in this Amiga).
In this case everything worked fine, including PPC programs, except Warp3D enabled PPC programs that crashed the system – All the time.
68k Warp3D applications worked fine. Non Warp3D PPC applications also ran fine. It was just PPC Warp3D applications that failed to run.
Can you guess how I fixed it? -By not running power to the Molex connector on the Firebird.
PPC was thought of as the next generation CPU for the Amiga. It was logical because both PPC and 68k was made by Motorola and 68k was not developed anymore. Motorola was not Intel which was considered Wintel and was lame and dumb.
It was a different time back then and it was much more fanatical, had they chosed ARM or Intel for the Amiga in the middle of the 90ies then probably half the user base would have left the Amiga community in disgust. Even if it could have been better.
I still remember a guy on an IRC channel who wanted to #%&& Collas for 4-5 hours straight in a channel when Collas had said that the next gen Amiga would be based on Linux back in 1999.
In hindsight PPC was maybe not the right choice, but who knew it back then. What everyone wanted was the OS, Workbench, to be fully ported to PPC.
That eventually happened with AmigaOS4 around 2006 for owners of a Phase 5 PPC accelerators. Using AmigaOS4 classic was nice but limited as it only supported system friendly software, understandable as it is just like AmigaOS4 for next gen hardware.
Thus for most PPC owners, they still run Workbench on 68k CPU while the PPC CPU is just sort of a co-processor that runs PPC applications launched from the 68k Workbench when needed.
But that does not mean there are no interesting PPC software to run. You wont see them here today though as I was just trying my PPC card out with some standard software such as:
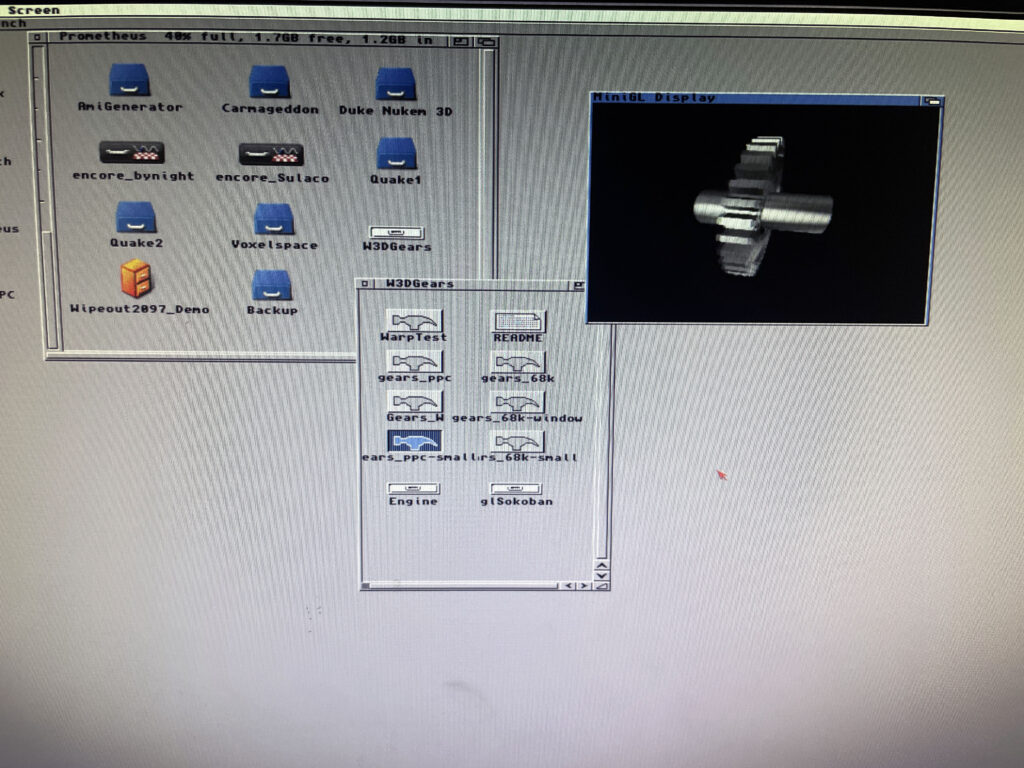
This is just a demo to check that Warp3D and PPC is working. Imagine the gear spinning around very smoothly. There is a 68k executable too, that is great stuff if one want to compare performance between PPC and 060.
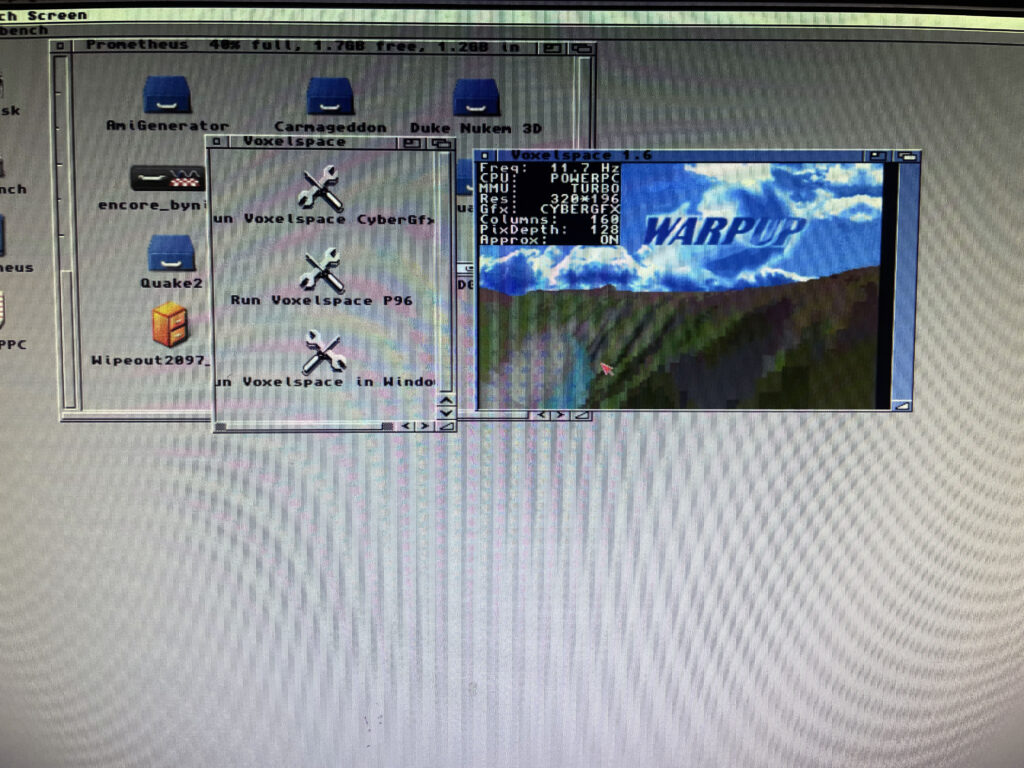
This is another PPC demo, the Voxelspace demo where you can travel around a voxel landscape. Hit F1 to render the voxel landscape with 060 or PPC and see the impressive speed up with it running on the PPC CPU.
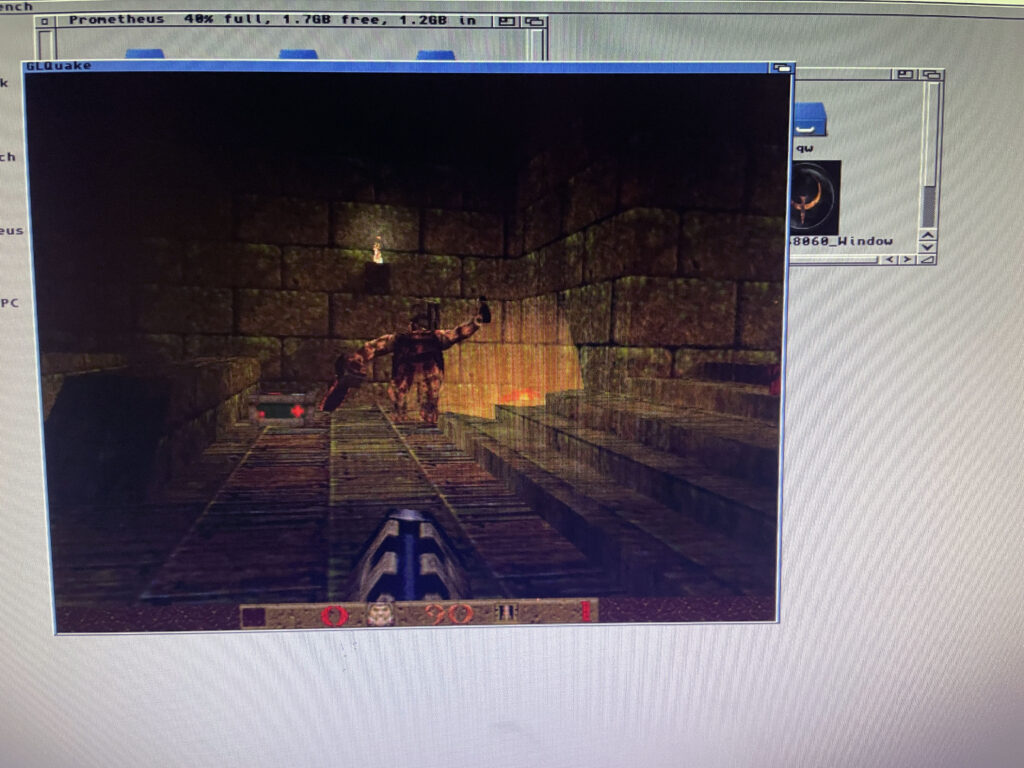
Off course, the raison d’être for having hi-end Amiga systems – trying out Quake on it for 15 seconds and then doing something else.
Here are some links about PPC on the Amiga:
N2630 is a great 68030 CPU card you can build yourself for the Amiga 2000 or A2000EATX project. You can find more information about the N2630 project on the website here.
There is a model for a bracket for the N2630 that you can 3D print. I did that but it was too flimsy and eventually broke in two pieces.
I was planning on ordering a 3D metal print of the bracket from JLC but heard of arymanx on Amibay who had made a small batch of metal brackets for the CPU card. In this hobby, you have to act fast, or the chance might never come up again so in less than a week a shiny metal N2630 Amiga 030 CPU card bracket arrived to me from UK.
If you are interested in a metal bracket for the N2630 too, feel free to contact arymanx directly about it on AmiBay.
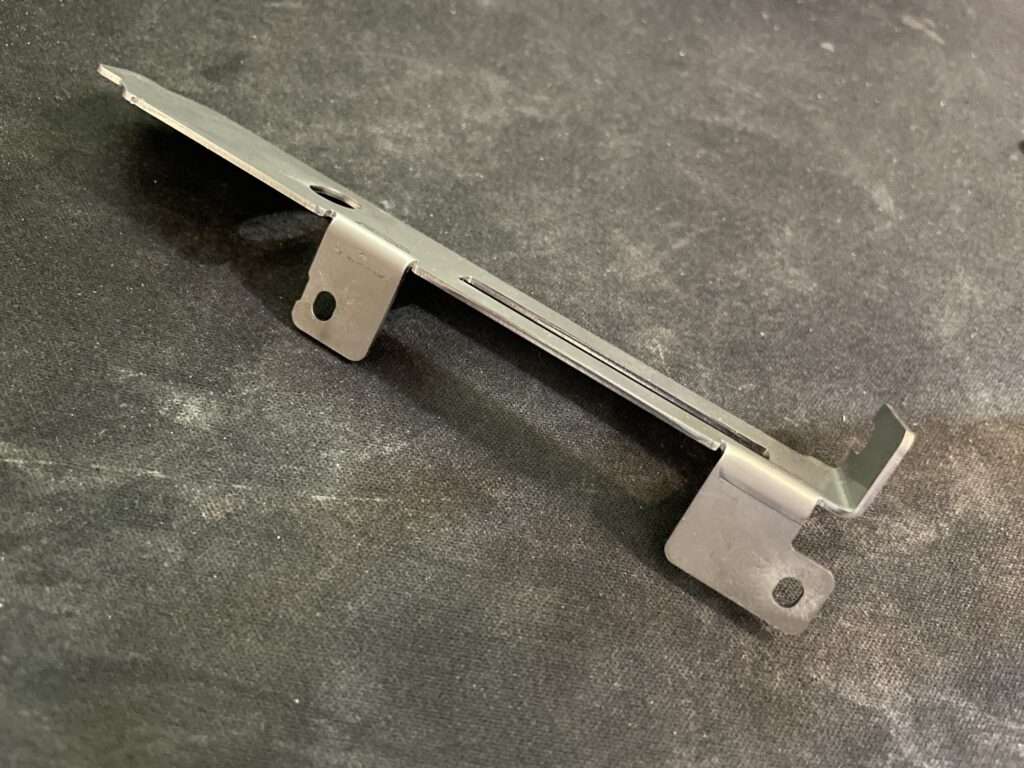
Its just a bracket, but is a great reminder of that it is the small details that makes a DIY build great.
I mounted the bracket to the N2630 with two screws and nuts. The nuts got a drop of blue Loctite to hold them secure. Fitment was excellent.
Not only does it hold the card better in the case it also looks better.
Pay no attention to the nut wedged between bracket and case. The CPU slot I used when building my A2000EATX motherboard was taller than a regular CPU slot used on the Amiga 2000 making the CPU card sit further out from the motherboard.
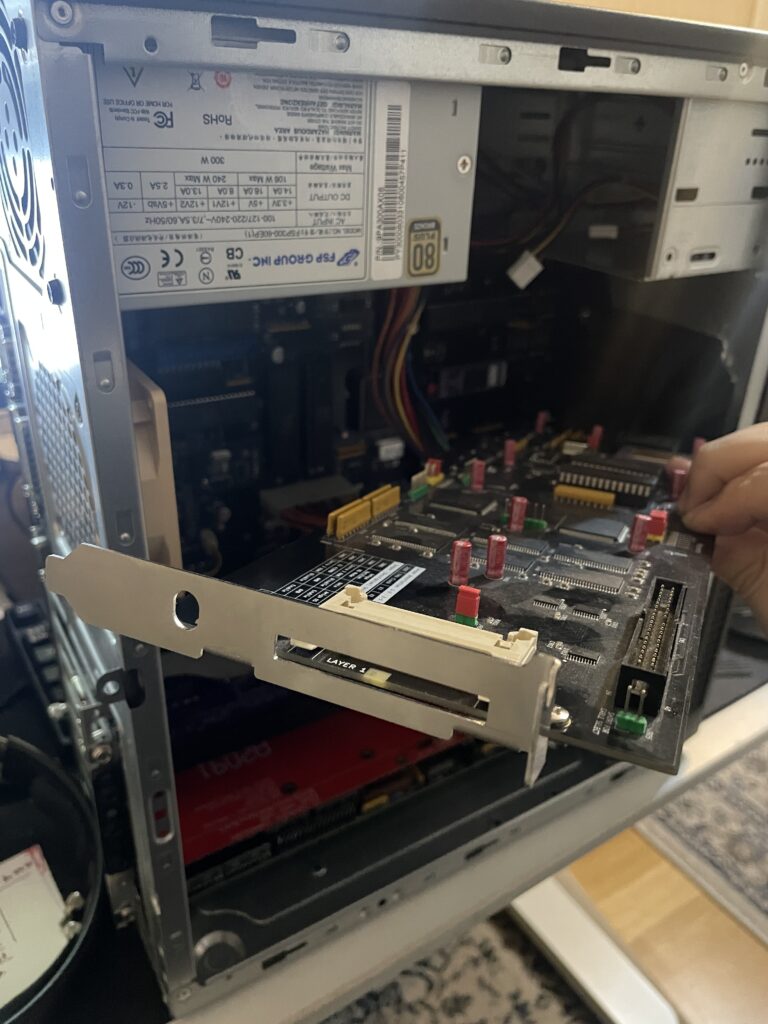
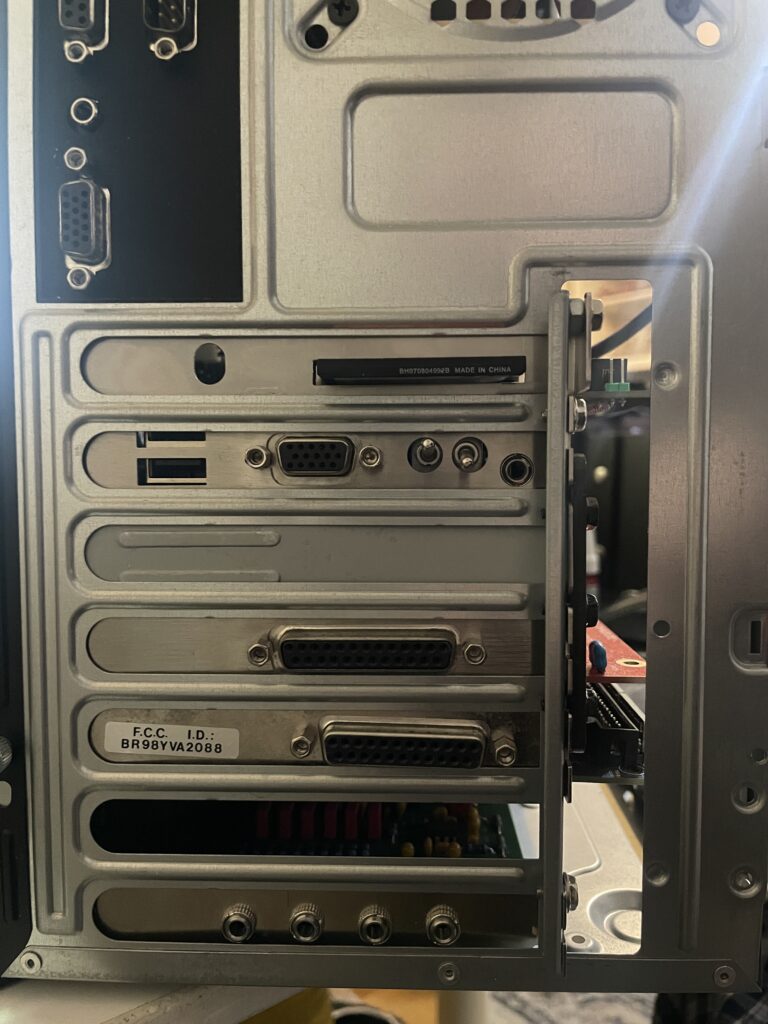
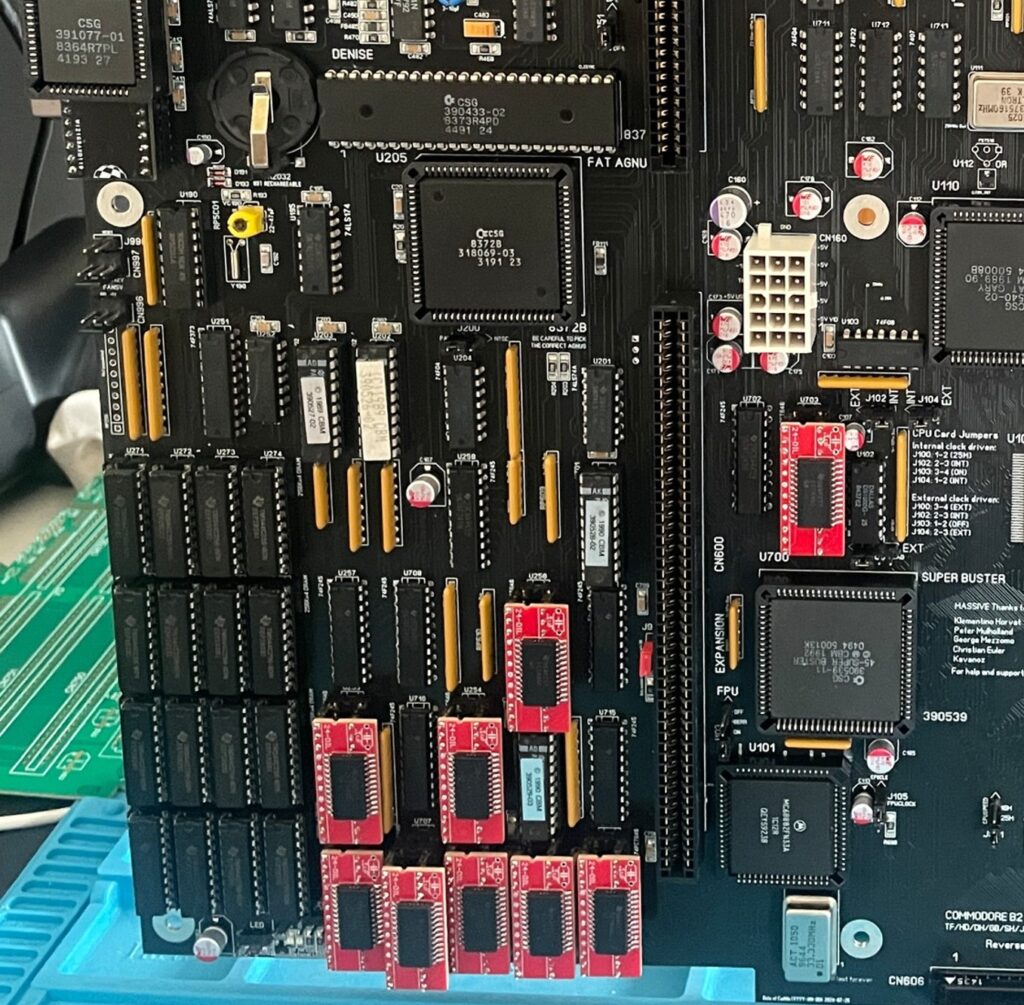
Here is my Amiga 4000D with PCI slots. It has an Firebird daughterboard that has PCI slots, Zorro slots and one video slot. More information about the Firebird PCI boards here.
This is an older picture of my Firebird PCI daughterboard with no cards mounted to it to get a better look at it. This was before it was fully built, that is why it only has one PCI slot.
I tried PCI on the Amiga years ago on my A1200 with a Mediator A1200LT – I was not sold on the concept as I felt the performance was lacking. Since then I wanted to give PCI on the Amiga a fair chance again and so I had to get the Firebird to try out PCI on a big box Amiga properly!
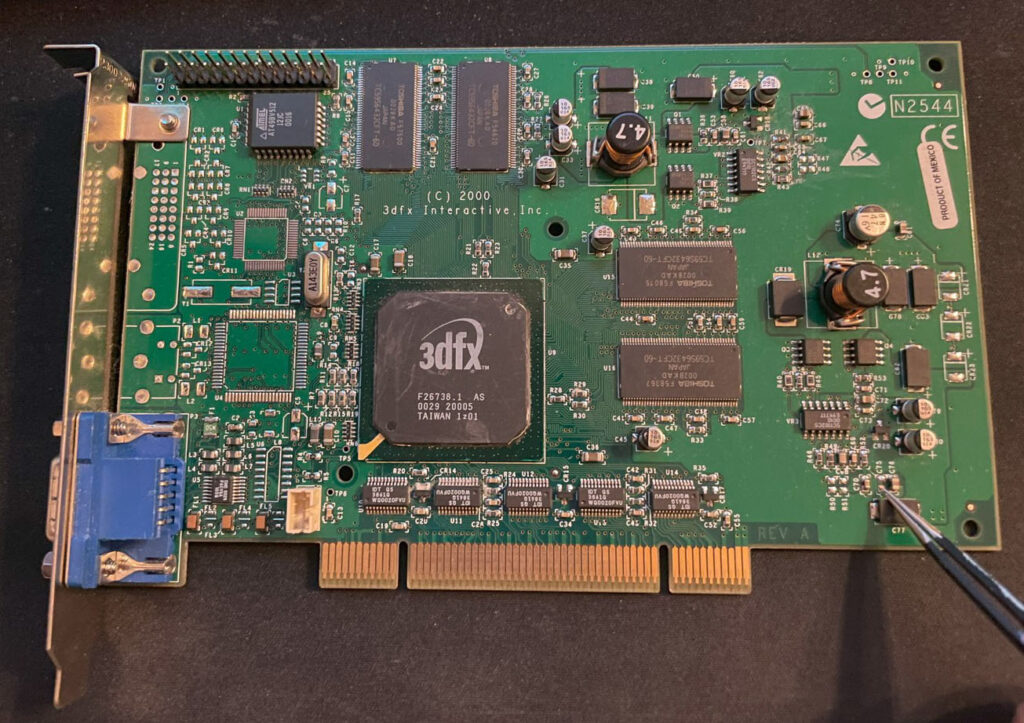
Here is a 3DFX Voodoo 4 PCI graphics cad I got years ago, back when they sold for a reasonable sum. It has spent close to 15 years in storage. Along the way it got a capacitor knocked off (that I am pointing on). I replaced the capacitor, added a heatsink and fan to it and hoped that it would still work.
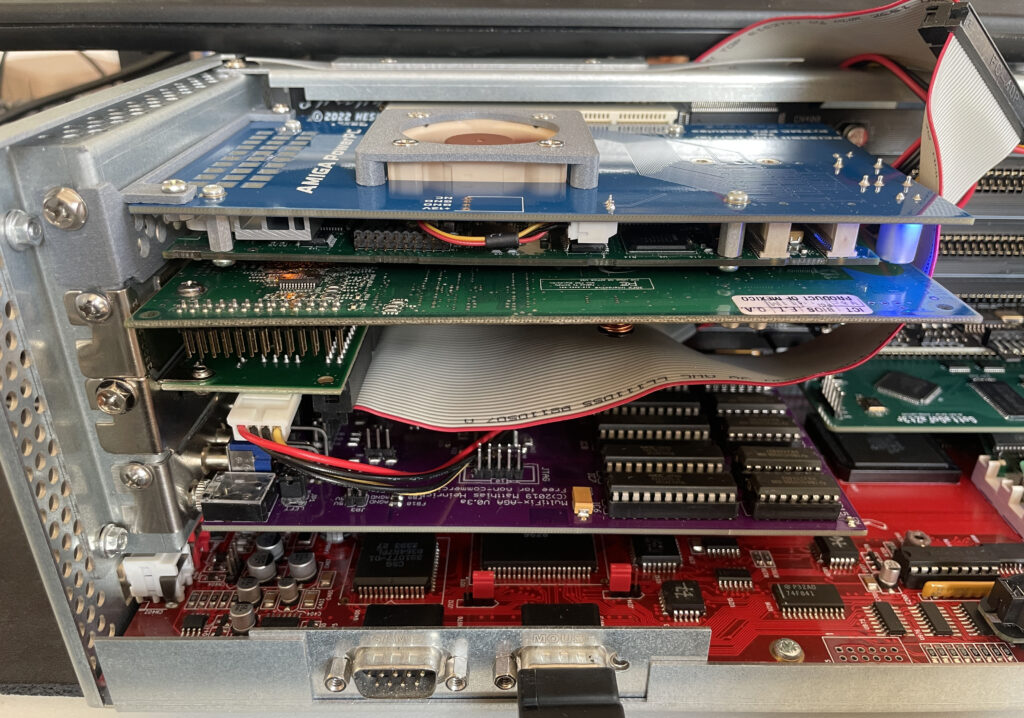
Here is a closeup of the Amiga 4000D with the Firebird PCI board holding the Voodoo4 PCI card and a PMC carrier holding a PPC card. I will make a separate post about the PPC card in the top slot in the future. The other cards you see is a purple Multifix-AGA, GottaGoFaZt3r and a CPLDICY.

…aaaaand surprise, the 3DFX Voodoo4 PCI graphics card worked!! Installation went really smooth even if it was not a simple point and click installation.
There is only so much time on the weekend so I ran out of time installing the PPC card, hopefully I will look into it next time. I will also need to set up an automatic switcher between RTG and scandoubled output. As usual, you are never done in this hobby….

Don’t know why or how, but somehow I am back on the classic 68k PPC hype train! Enjoy watching me rip my hair off my head trying to get this PPC board going in my A4000 in the future!

I wrote about the troubles I had with the ZZ9000AX soundcard for the ZZ9000 graphics board in a post a year ago. No matter what I tried I got a horrible distorted sound from Paula if Paula output was routed through the ZZ9000AX. That was just half the story, the other half was the insane bus noise the card picked up. I was not alone with this problem as I heard quite a few who had the same disappointed stories to tell about their ZZ9000AX Amiga sound cards. One chap I know called the card “an utterly terrible piece of sh*t hardware“.
An intense discussion with the creator of this card followed where it was concluded that the problem could not be confirmed, a pointer to the schematics of the card was offered – An electronics enginering degree was however not offered. Maybe then I could have found the error myself.
Patience rewards those who wait, that is something every Amiga user knows about, it is just a matter of time before Amiga will take over the computers of the world and become the no.1 computer again.. oh wait its not 1998 anymore back to the ZZ9000AX and 2025…

So I was hanging out in a Discord and noticed rumors about the ZZ9000AX now performing fine by doing a simple hardware modification to it. Apparently, removing the chip U4 from the ZZ9000AX would fix the insane sh*t quality (mildly speaking) output from the card. After further investigations it was brought up that this groundbreaking news was communicated on an IRC channel (yes, it is 2025) for the Amiga community to pick up on (why not post it on usegroups next time?).
I could barely keep my hand off my soldering iron – In 5 minutes the chip was removed from my ZZ9000AX never to be seen again. If the card failed in the process I could always retire it in the round archive (meaning, in the garbage where I had been tempted to put the card to rest for more than a year).
Would it work or not!?!?!

IT WORKS!!!!!!! The distortion and heavy background noise is gone.
But I can still hear some bus noise in the background when opening drawers, in comparison with how it was before, this is something I can live with.

Alicia is an Amiga 1200 clone in the popular Mini-ITX form factor. It is a nice DIY project you can buy as a semi built PCB. As I had previously built a couple of Denise A500+ clones, deciding to build the Alicia 1200 was a no-brainer and I think I was not alone in that thought as the interest around it has been great! Read more about the project here.
I remember fondly when the Mini-ITX form factor was released to the public around the new millennium. It was a really exciting time in PC hardware and watching the new tiny form factor it grow and become an established platform has been a pleasure to see and experience since I have been on the Mini-ITX train many times since then.
But to be able to see, build and own Amiga systems in this small form factor with real Amiga chips is the icing on the cake – Amazing!

I have not written a lot about Denise, the A500+ clone, here on my blog even though I have wanted to do that for some time.
I “blame” the beginnings of my interest in this “wallet busting” hobby on this specific project, YOLO. So expect a better post later sometimes. I remember watching plenty of YouTube clips of doing SMD soldering with a soldering iron 5 years ago and asking myself, “can I really do it?”, then I ordered a Denise board and a package from Digikey. Unpacking the first 0805 capacitor, I questioned what I had gotten myself into back then.
Anyway, I think it could be interesting to show off my Denise build before moving on to the Alicia 1200.
The Denise is an Amiga 500+ clone in Mini-ITX form factor, it has all the regular chips the A500+ has and also two “dumb” (as in no Buster) Zorro 2 slots. The PCB is jam packed but everything is beautifully laid out on the board.
Point I wanted to make was that this has been a very stable Amiga and it is awesome to have an Amiga with a small graphics board, scandoubler, NIC and 030/HDD in a standardized small form factor – That it is Mini-ITX is just icing on the cake.
To think this kind of hardware was A2000 territory yesterday is crazy. Anyway, let’s move on to the Alicia Amiga 1200 AGA clone…

Alicia 1200 is a kit, so one have to build it oneself. I have built a few Amiga kits myself as stated above so I did not expect any problem with the Alicia build. I usually build my projects from scratch, but in this case it has all the passives and common chips mounted. This saved a ton of time.
Lets talk PLCC sockets and chips
I decided to build my Alicia without PLCC sockets. I have a technique that works really well for soldering PLCC sockets without removing the inner part of the socket. In my experience soldering PLCC chips directly to the PCB makes for a more secure connection and eliminates any potential contact issue. I feel hot chips such as Paula, Lisa and Alice runs cooler when soldered directly to the PCB. I do have a few Amiga motherboards with full PLCC sockets for testing purposes.
Soldering the PLCC chips might be difficult if you are not used to doing them. I solder the PLCC chips with a relatively large hoof tip. Not saying the hoof tip is the definitive success factor. My success is probably from doing a LOT of PLCC chip soldering and getting used to a specific technique.
Most parts for the Alicia 1200 can be taken from an Amiga 1200 or can be found on Ebay, Amibay or from the “usual” places.
You will need the full Amiga 1200 chipset, including Motorola 68020, Budgie and A1200 Gayle. You will need an ADV101 or VP101 but you wont need the keyboard MPU. Memory can be taken from an Amiga 1200 too (but pay attention, some revisions come with incompatible memory that physically won’t fit). If you want to run the RTC you need a clock chip.
A 23 pin video connector is not needed and in fact can not be used, instead Alicia uses a regular VGA socket, so you have to make your own RGB cable if you plan to use it with SCART. You will need a PCMCIA connector, but that can also be take from an A1200 motherboard (hot air is your friend).
Everything else can be ordered from Mouser or Digikey.

The first parts I soldered was the Budgie and the Motorola 020 CPU, they are both surface mounted chips and where desoldered from an Amiga 1200 motherboard. I actually did not know if they worked or not, but as they are mounted in a good position on the motherboard I could always desolder them and replace them if they failed to work.

You may have built a ReAmiga 1200 and struggled with the memory, I have. It is difficult to do a good job when the chips sit so tight together. I am not a fan of using hot air to solder them. Thankfully on the Alicia 1200 the memory chips are generously spaced leaving plenty of space for my preferred hoof tip technique making this task very enjoyable. This shows in the clean result.

Now its time for some PLCC chips. I have nailed the technique for soldering PLCC chips. But the challenge is getting them aligned correct on the solder pads so the joints form a straight line. I got successful with the first chip at the top left, Gayle. If you fail to align the chip it will still work but may look a bit off. Depending on your level of OCD this might be totally acceptable though.

Here are all the PLCC chips soldered to the Alicia 1200 PCB. I think this was around 4 hours of work in total. No idea if it works and no way of testing it yet. Let’s hope it works.

I am not alone when I say there is an universal curse around BOM orders. It is an unofficial rule more than an exception that it is derigeur to miss to order some small part or important part. In this case, it was a small chip on the bottom of the PCB and the ATX power socket.

Once I got the missing parts I was eager to try Alicia 1200 out and see if it was working. And it was here I stumbled upon a problem, I did not have a suitable screen or RGB-SCART cable to test it. I thought I could use a 23 pin to VGA converter and hook up my old RGB-SCART cable with a 23 pin connector, but it did not work.
Just to verity that it worked I opted to do a testrun with a temp solution: using my Indivision MK3 that I have in my Amiga 1200 so I could get HDMI output.
Update: I have since built a VGA to SCART cable according to the instructions in the manual and I recommend everyone to do that to test that the port is working.

DiagROM boots and all tests checked out fine! The image above does not do justice to the image quality of the Indivision MK3, I was almost ready to fork out cash for a second one! This is a beautiful hardware combo if you want AGA only.
Sound played fine on the Alicia 1200 when testing channels in DiagROM. I think the sound circuit is the same on the Alicia 1200 as on the Denise as i recognice a few of the parts on the motherboard here.
I would descibe the sound on the Denise as slightly tinny, metallic or a bit more clean than a regular Amiga 500 or Amiga 1200, it is an interesting attribute of these motherboards and adds another dimension to the sound output of the Amiga. Cant wait to try it out with the Sound Enhancer.

Once Alicia 1200 was fully tested I could go ahead and add the final connectors including the PCMCIA slot (that I cut down to make it shorter since it sticks out a lot).
So let’s end this post with some features that Alicia 1200 has that a genuine Amiga 1200 does not have. First it has a real time clock. Then it has a video slot on top left side. There are no devices to connect here today, but there are rumors of scandoublers and other exciting stuff. Lets see what the future holds. I have suggested a 3DFX card numerous times lol.

The larger slot is the Tornado slot, as you can see on the image above it is converted into the Amiga 1200 slot. Hopefully someone will release a direct mount CPU card for the Alicia 1200, if not, we can just use the converter above and run our TF1260s or PiStorms or whatever will be available directly on that.
Let me follow up in the future what case I will chose and what CPU card I will use. I am leaning towards PiStorm, but the beauty of a 060 in this little system is very tempting, almost too tempting to resist. And with the way the CPU card is mounted, there is plenty of space to run a badass heatsink over the 060 unlike in an Amiga 1200… you can be sure I will follow it up here in the future!
Great work with this project everyone involved!

Just finished the last bit on the AmiGUS I built this weekend. I don’t have an USB blaster so wont be able to program it yet… if it works I will build two more for my self and have two PCBs for sale.

My Alicia is ready for a test run, but I am missing two key parts, one IC I forgot to order and the ATX PSU connector. Hopefully it works because its going to be a challenge replacing some of the chips if not.
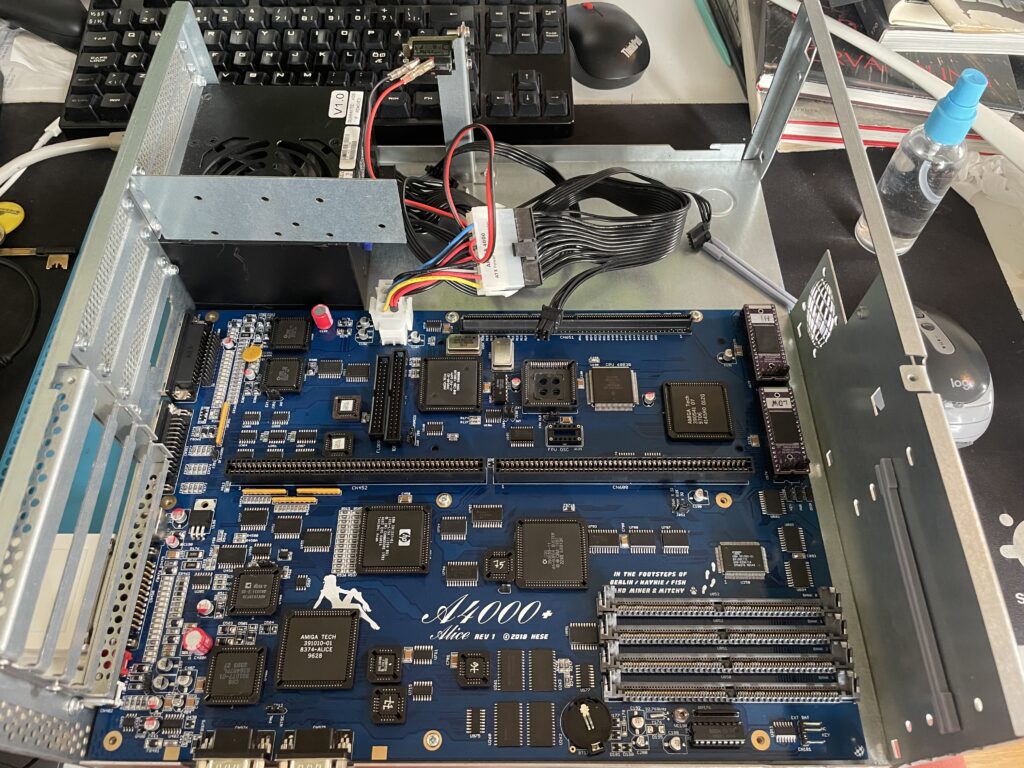
I had two summer projects this year that I recently finished. One was an Acill A4000D replica motherboard and the other was a Hese made A4000+ Alice A4000D CR motherboard replica. You could say two brothas from different mothas or something…
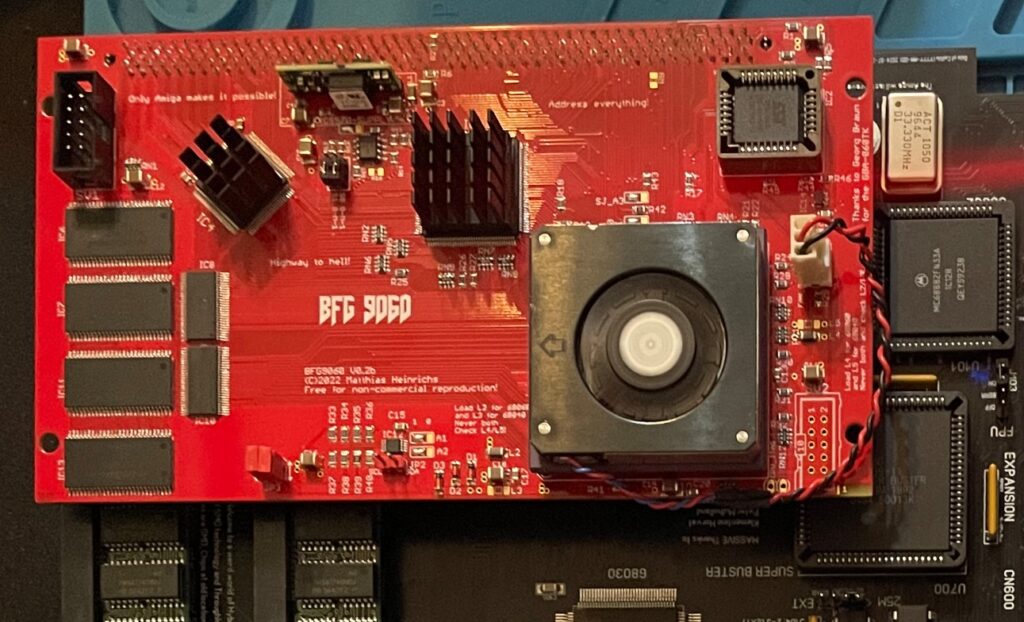
Both motherboards worked fine when doing basic test runs, however they both failed to run with a BFG9060. All I got when running them with a BFG9060 060 CPU card was a black screen.
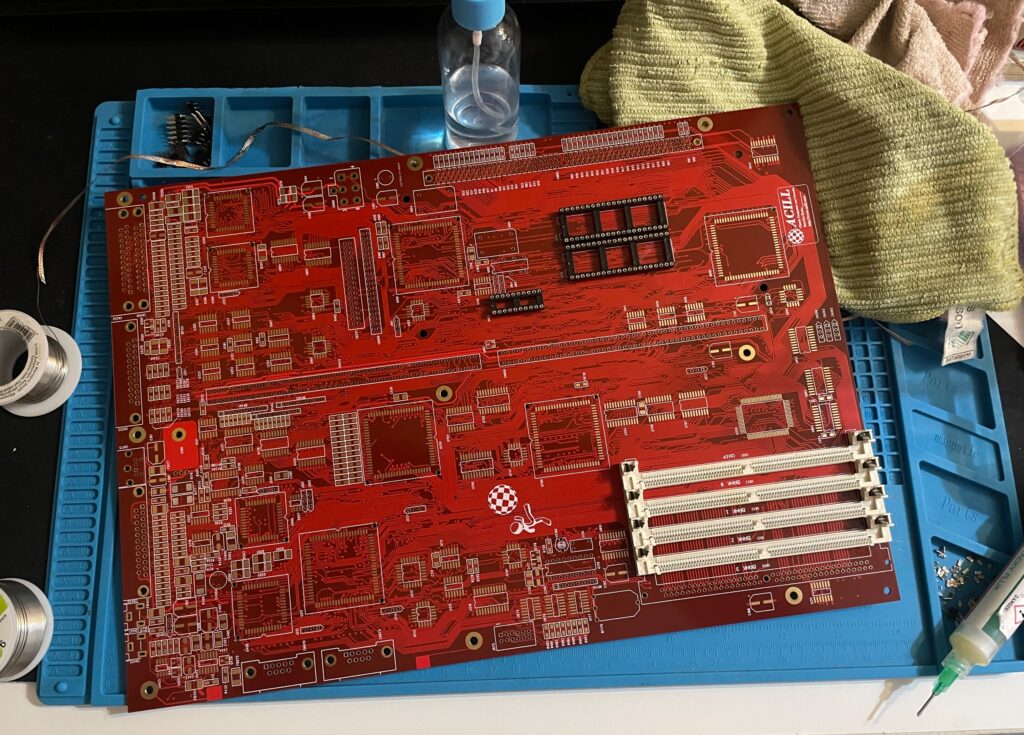
Anyway, as usual building them up was pure pleasure from start to finish. I even enjoyed desoldering the Acill A4000D motherboard from a few passives and pin headers someone else had a false start with. I mean, off course you want a full set of pin headers soldered to your 400+ small parts PCB (not really).
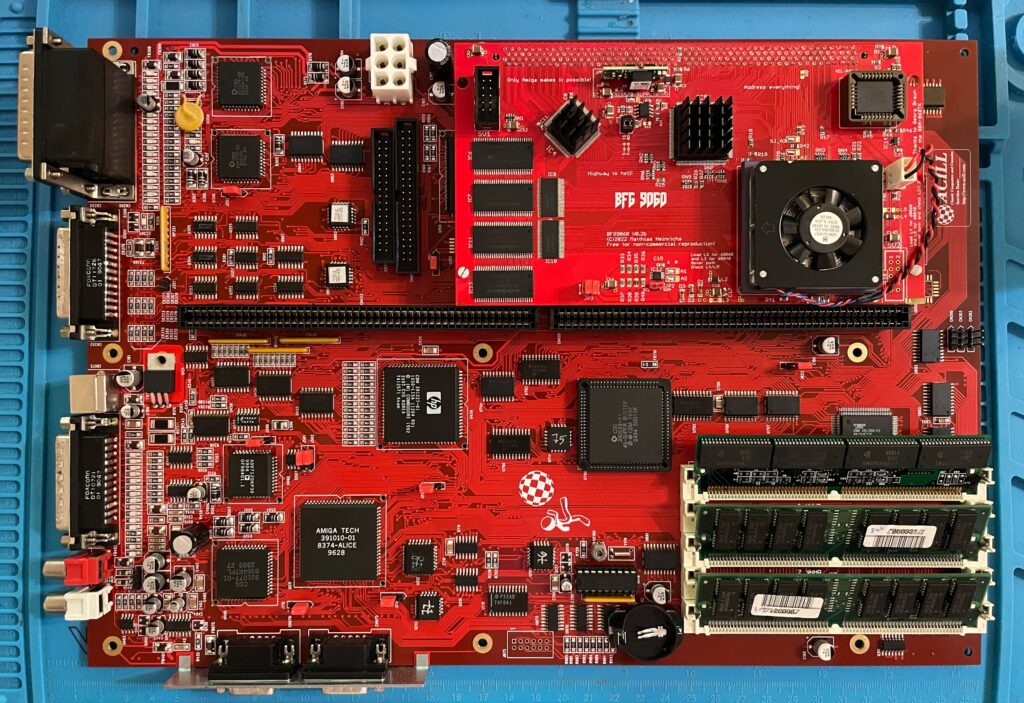
The motherboard was all built up and looking good in shiny red matching a BFG9060 with a mystery (rev. 1) 060 I built last year.
As good as it was looking it failed to run with the BFG9060. It was working fine with the A3630 CPU board I built earlier this year, but not with the 060 card. That reminded me that I had the same problem with my Alice A4000D motherboard a couple of weeks ago.
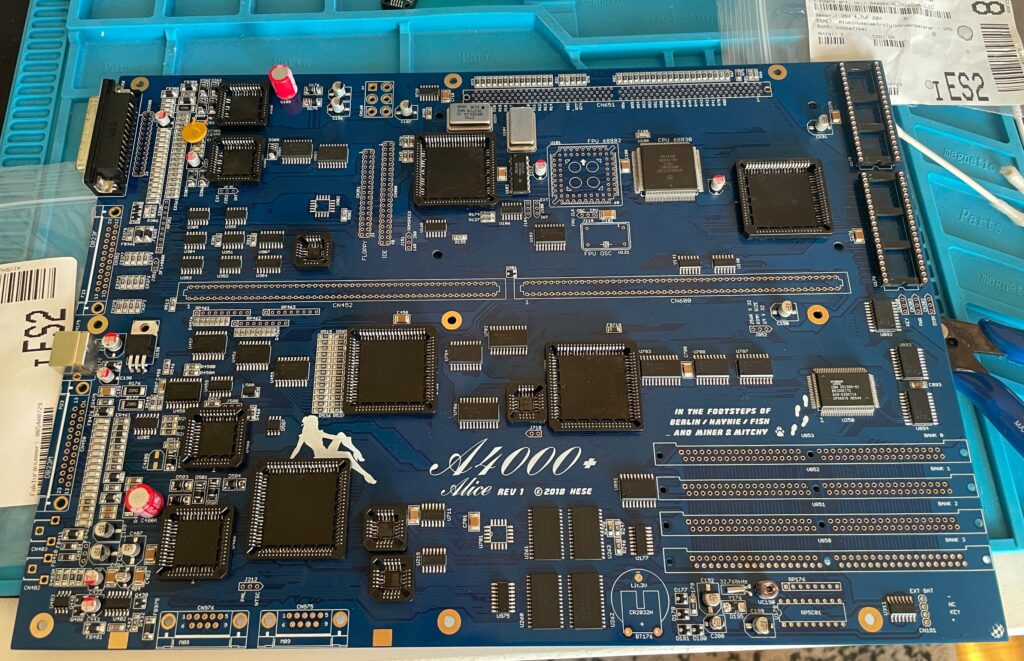
The Alice A4000D has an 030 CPU on the motherboard so it does not need a CPU card. It was working fine with the on board 030.
I got the suggestion to try a new delay line as that could be the problem the CPU card failed to run. As the A3630 has exactly the same CPU as the one mounted on the motherboard, it is difficult to say if the A3630 was running or not.
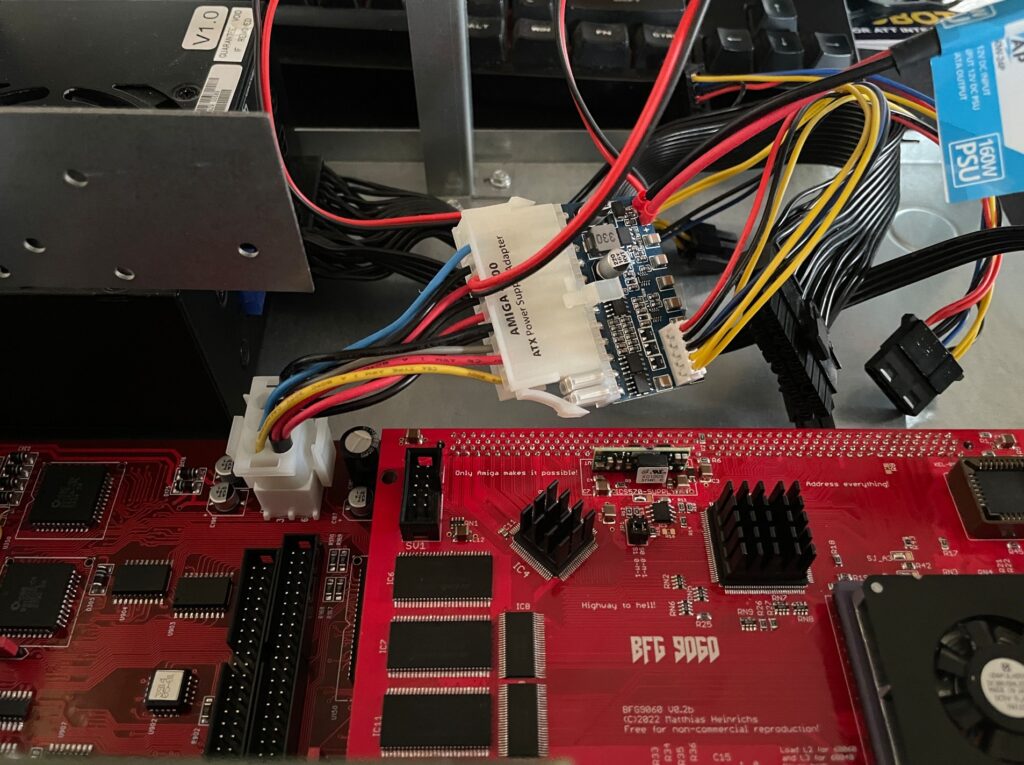
If you are in this hobby you have to grow a passion for trying all hardware combinations to find the solution. In this case, the reason for the Amiga 4000 getting a black screen when running a BFG9060 was the PSU as everything seemed to run fine with another PSU than the SFX one I had in the A4000D case.
I changed the SFX PSU that previously was working fine with the EXACT hardware setup I am running here (but different Amiga 4000 motherboard) with a small ITX PSU and suddenly DiagROM worked fine and detected the 060 CPU.
This lead me to believe that maybe the PSU was not pushed too hard as some ATX PSUs fail to run if there is a tiny load on them (or something like that). So I decided to do a final test by adding some cards to my A4000D and try the SFX PSU again.
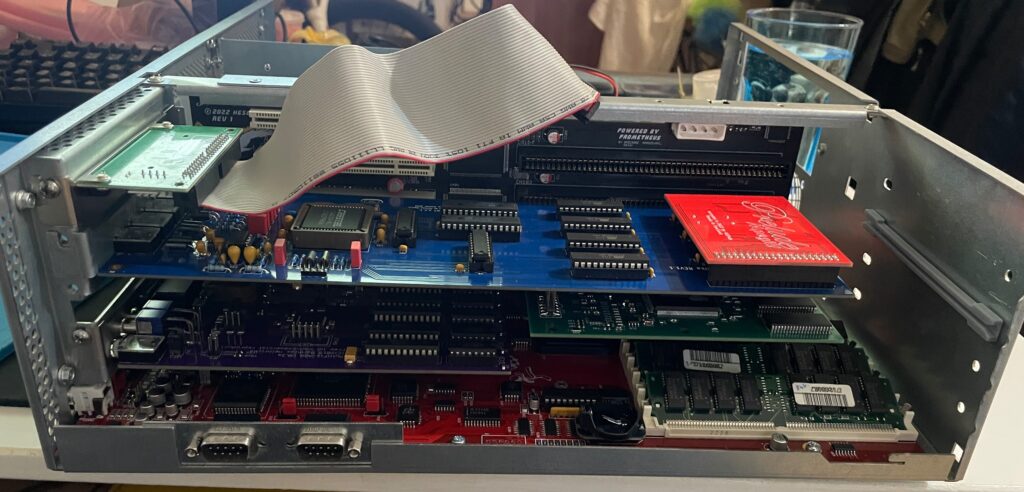
Unfortunately it did not start with the SFX PSU and 060 card even if I loaded the machine with all Zorro slots filled, including adding an old 3.5″ harddrive.
So next step is to get a new SFX PSU. But at least I know I have to working motherboards!
Update! 20251215
Apparantly it was the Kickstart that was the problem.
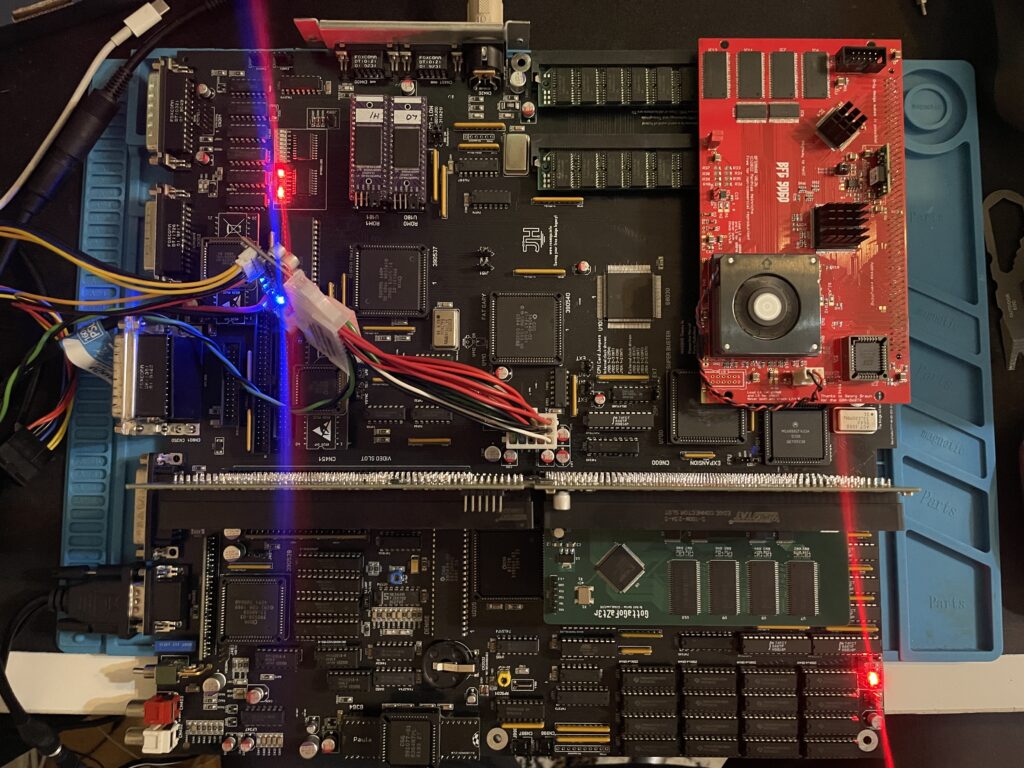
You may have seen my previous post where I did a test run on my ReAmiga 3000 that I finished earlier this year. If not, check out my post about my ReA3000 that I built in April here.
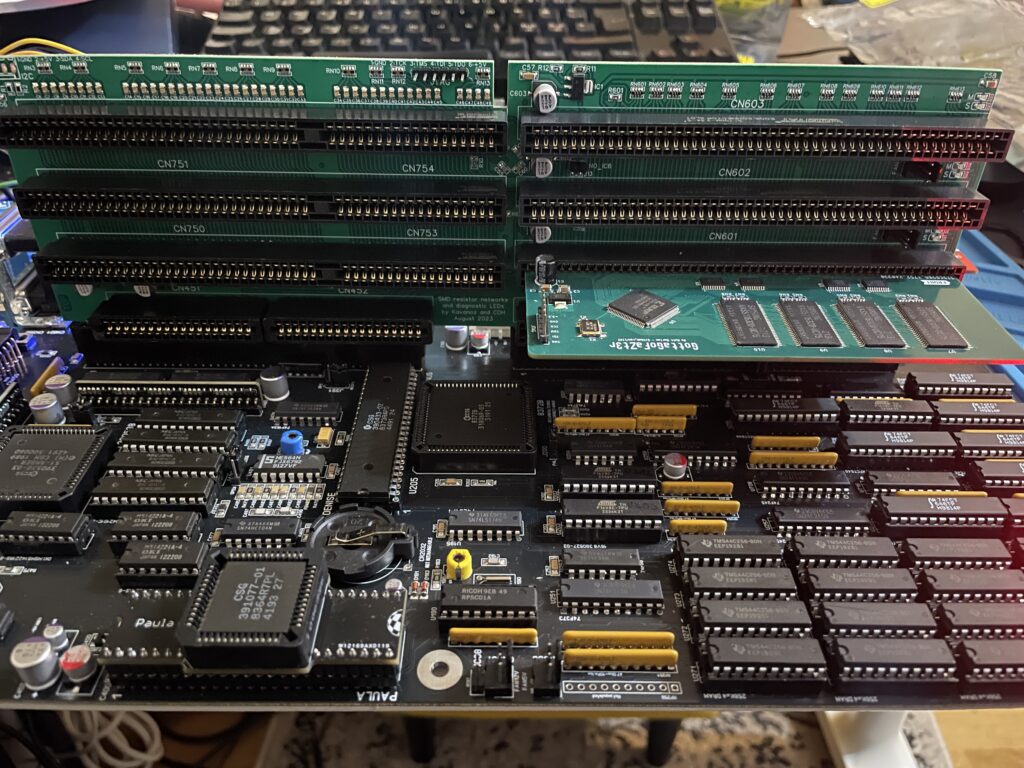
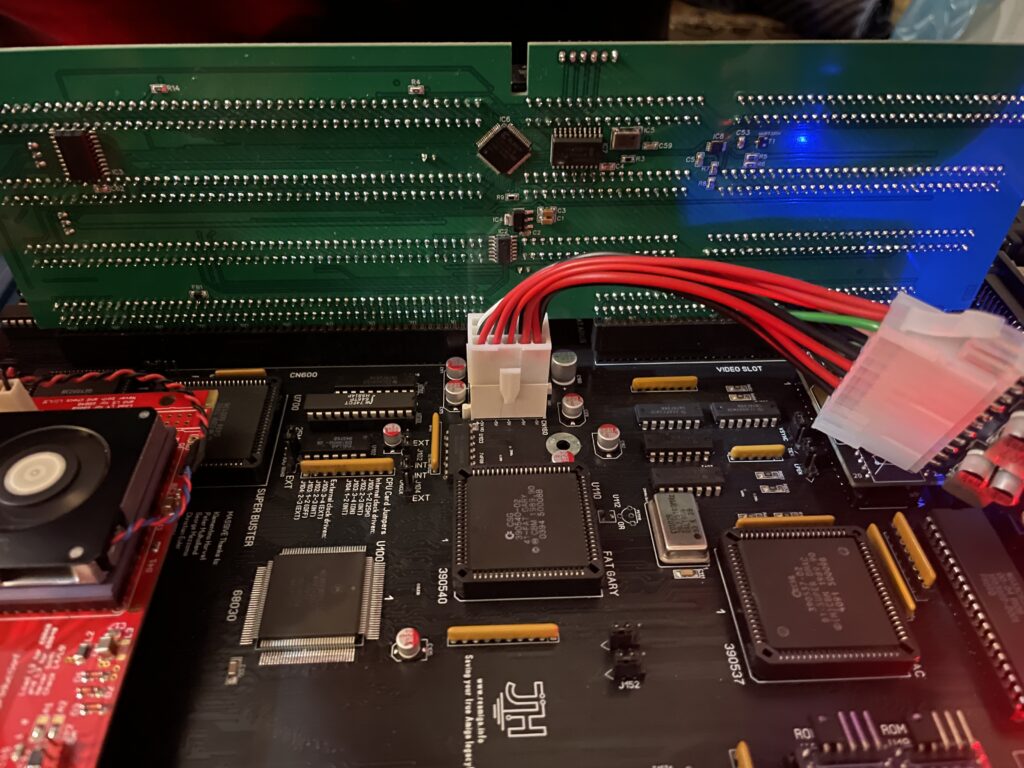
While I did do a test run in DiagROM previously I did not have a daugherboard for it so I just whent through the usual tests (successfully) and called it a day. This time I did a more comprehensive test session where I tested a Amiga 3000 daughterboard, a BFG9060, a GottaGoFaZt3r 256MB Z3 memory card, programmed and replaced the logic chips and also replaced some ICs that I had to use adapters for previously.
While my ReAmiga 3000 started up fine in DiagROM it failed to run with a Kickstart rom. I was puzzled about this since it was running fine in DiagROM. No matter what I tried I ended up with a black screen. Problem was solved by adding the daughtercard. Now Kickstart boot screen came up.
I am using a Matze A3000DB, more info on it here. This is just like a regular Amiga 3000 daughterboard but it also has I2C functionality so you can monitor temps. More info about I2C here, the added functionality is based on that project. So to be honest, I have not really fully understood I2C, perhaps I will do a deep dive in the future. I have an CPLDICY card I built last year and its neat to see temps. I am thinking this could be interesting to monitor if running a tight A3000 case with bad cooling.
Another note, this is a version of the Matze A3000DB with some added functions by kavanoz & CDH, see more here about this specific version of the daughterboard.
A GottaGoFaZt3r 256MB Z3 memory card was inserted and it was detected by DiagROM.
Recently I built an A4000D that failed to run with a CPU card. That motivated me to test my older builds with a CPU card to make sure they work properly with a faster CPU. The only issue I had was to figure out how to jumper the motherboard, then it was smooth sailings.

DiagROM identified the 060 and also the fast ram. Now I need to do a 6 hour fish render and stability will be tested (something to do for the future).
If you look at the BOM for the ReAmiga 3000 you can see that Chucky recommends replacing the 74F646S with 74FCT646. Currently 74FCT646 can only be found in SOIC-24 from Mouser and Digikey and not in DIP so you need a SOIC-24 to DIP adapter to use them. While the adapter worked fine I just felt it would look better to run DIP chips instead. I had an UTsource order going for my A2386SX order in the pipeline so I added eleven 74FCT646 chips to that order from UTsource. Why 11 when the A3000 only needs 9? Well two of them is going to my A2386SX boards.
The 74F646S chips actually runs hot, especially when there is 9 of them, that is something I noticed when using them from my donor machine. So it was a nobrainer to replace them with cooler running chips.
As I put in sockets for all the 74FCT646 chip adapters I am thinking of removing the sockets in the future and solder the chips directly to the motherboard for an even cleaner look. The ground plane in an A3000 is brutal though, not sure I wanna wrestle with this board desoldering stuff again. Desoldering the KEL 200 pin CPU slot was a nightmare.
There are four logic chips on the Amiga 3000. About 15 years ago I had the oppportunity to buy a broken Amiga 3000 cheap because it had a broken display output. Turned out it was because one of the logic chips was broken, so it was an easy fix to just replace one of the chips with a new one.
So to future proof this ReAmiga 3000 build I replaced the logic chips I got from the donor A3000 with modern alternatives and got the JEDEC files to program them with from here.
I hope I can find a case for this build, they are difficult to come by but occasionally you can find one. Actually wish I had one now as I would like to set it up to a running system!
C’est la vie…